Sub-Zero · Owner guide
How to Clean a Sub-Zero Condenser
Switch the breaker off, open the grille at the top or the kickplate at floor level, and vacuum the coil with a soft brush, stroking along the fins. Twice a year suits most homes; shedding pets, a busy range and salt air call for more.
$79 service call, applied to the repair. Monday to Saturday, 8 AM to 7 PM.
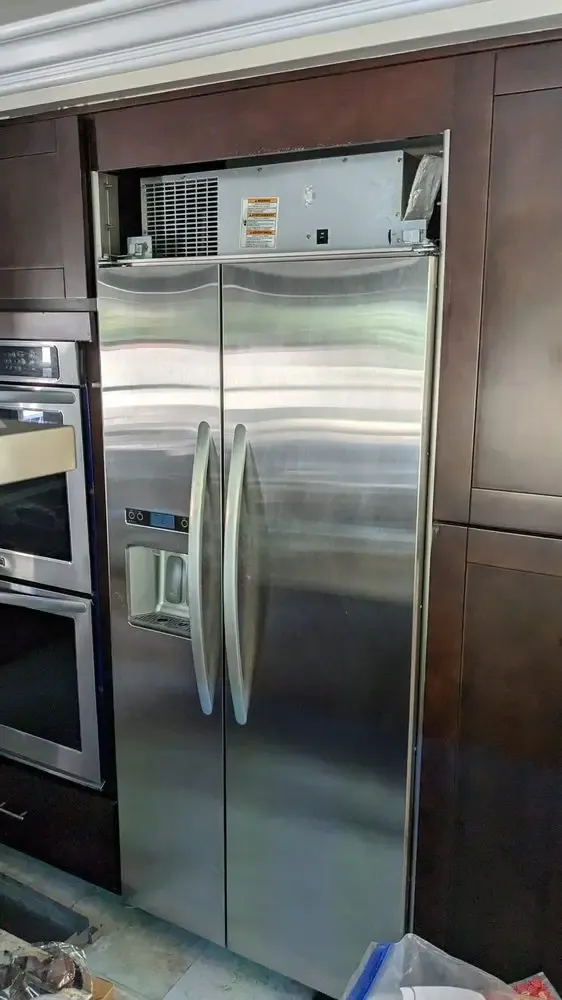
In short: turn the power off at the breaker, not at the keypad. The coil is behind the top grille on Classic, PRO 48 and most 500 and 600 built-ins, and at the bottom on the 600 series 601R, 601RG and 601F, Integrated, 700 series, undercounter and ice machine models. Vacuum the face of the coil with a soft brush, moving the way the fins run, and clean the grille openings too. Call if you find oily patches on the tubing, powdery fins or a fan blade that wobbles.
Why the condenser matters so much on a built-in
The condenser is where the heat pulled out of your food leaves the unit: a finned coil with a fan pulling room air across it. A Sub-Zero built-in is boxed into cabinetry, so all of that air enters and leaves through one grille. When that coil mats over, the compressor runs longer and hotter, the service indicator lights, and finally a section drifts warm. Years of that heat wear out fan motors and compressors early, which is why a clean coil has so much to do with how long a Sub-Zero lasts.
On Classic combination models, one condenser with separate circuits serves both the refrigerator and the freezer compressor, so a dirty coil slows both systems at once. The original 600 series, built before serial 1810000, prints VACUUM CONDENSER on its display. The BI-era Classic control has no condenser sensor; it only notices that a compressor has run far too long, as the service light guide explains.
Where the condenser is on your Sub-Zero
| Series | Where the coil sits | How you reach it |
|---|---|---|
| Classic (BI and CL) side-by-side, over-and-under, French door, all-refrigerator and all-freezer models | On top, behind the grille, beside the compressors and control board | Lift the front of the grille. Leave the compressor cover and the control box closed. |
| 600 series (except 601R, 601RG and 601F), most 500 series models, PRO 48 | On top, behind the top grille | Lift or remove the top grille, depending on the model. |
| 600 series 601R, 601RG and 601F all-refrigerator and all-freezer | At the bottom, in the lower machinery area | Open the grille or kickplate at floor level. |
| Integrated and Designer columns and drawers; 700 series | At floor level, on a tray behind the kickplate | Remove the kickplate, held by a couple of screws that are sometimes hidden behind a magnetic panel. |
| Undercounter refrigerators, drawers and wine units | In the base, behind the kickplate grille | Air goes in through one part of the grille and out through another, so clean its whole width. |
| Undercounter ice machines such as the UC-15I | Behind the kickplate, at the right side on the UC-15I | The kickplate comes off with a few bolts. |
On tall wine storage, look for the louvered grille that is not a door or drawer. More on each line: Classic, 600 series, 700 series, Designer and Integrated, undercounter and ice machines.
How to clean a Sub-Zero condenser, step by step
You need a vacuum with a soft brush attachment, a long, narrow coil brush, a flashlight and gloves. It takes about half an hour; keep the doors shut.
- Turn off the breaker. The power key is not enough: on Sub-Zero electronic controls the board stays live when the unit is off at the keypad, and the condenser fan can start whenever a compressor does.
- Wait a few minutes and put on gloves. The compressor and nearby tubing can be hot after a run, and fin edges cut skin easily.
- Open the grille or remove the kickplate. Do not slide the machinery tray out, pull the unit from its opening or touch the wiring. Built-ins are anchored against tipping for a reason.
- Vacuum the face of the coil. Rest the soft brush lightly on the fins and stroke the way they run, up and down on most Sub-Zero coils. Brushing across folds them flat, and flat fins block air as surely as dust.
- Go a little deeper. Slide the coil brush gently between the rows where it fits and vacuum what falls out. If it needs force, stop.
- Clean the grille or kickplate. The louvers clog too. Wipe it with a damp cloth away from the unit and let it dry.
- Refit, restore power and listen. The compressors may wait a few minutes. When one starts, the condenser fan should start with it. Silence, scraping or rattling means a visit.
What not to use. No water, foaming coil cleaner or degreaser: the coil sits beside the compressor wiring and control board, and residue catches dust faster. Skip compressed air indoors; it packs dust deeper and blows the rest across the kitchen. Never straighten fins with a screwdriver, reach toward a fan with the power on, or bend tubing. A smell of scorched insulation or blackened wiring under the grille means leave the breaker off and call.
How often to clean a Sub-Zero condenser
Sub-Zero's care schedule for its UC-15I ice machine asks for a coil cleaning every six months and more often with pets or carpet. We use the same baseline for Sub-Zero refrigerators and adjust it to the house.
| Your home | How often | Why |
|---|---|---|
| Most homes | Twice a year | Ordinary kitchen dust and a little grease. |
| Shedding dogs or cats | Every three months | Hair felts across the coil, fastest at floor level. |
| Heavy cooking, a range or grill nearby | Every three to four months | Grease binds dust into a layer a vacuum only partly lifts. |
| Near the coast | Look quarterly; a technician check yearly | Salt air corrodes the aluminum fins and the fan motor. |
| During or after a remodel | As soon as the dust stops | Drywall dust can pack a coil within weeks. |
| Bars, wine rooms, outdoor kitchens | Every two to three months | Small front-breathing cabinets, lint, leaves and warm air. |
| A quiet second home | Once a year at least | Less traffic, but the coil still loads up. |
Clean it sooner if you see VACUUM CONDENSER on an original 600, a flashing service indicator, a unit that seems to run all the time, or hot air at the grille. Never tape over a grille to keep remodel dust out while the unit runs, and keep rugs, bins and pet beds away from a toe-kick. Outdoor units have their own concerns; see outdoor kitchen refrigeration.
When the coil is not the whole story
A packed or grease-bound coil
What it usually is: grease and dust baked into a felt deep in the coil, common on top-mounted coils near a busy range. The face looks clean, yet air still cannot pass.
What you can check: shine the flashlight into the coil. If no light shows between the fins, the inside is packed.
What we do: clean it from both sides where the layout allows, including the fan blade and shroud, then measure the recovery.
Condenser fan slow, noisy or stopped
What it usually is: a motor with worn bearings after years of running hot, or a blade that has slipped along its shaft. A clean coil with a weak fan still overheats the compressor.
What you can check: listen at the grille while a compressor runs. A squeal, a scrape or silence is the clue.
What we do: test the motor and what drives it, replace the failed part and set the blade where it belongs. See Sub-Zero making noise.
Corroded fins or an oily patch on the tubing
What it usually is: salt-air corrosion that turns fins to powder, or oil on a joint, which usually marks a refrigerant leak because oil travels with the refrigerant.
What you can check: look only, and take a photo.
What we do: confirm with pressure and temperature readings and repair it in-house. See sealed-system repair and Sub-Zero not cooling.
What a maintenance visit adds
Your cleaning keeps the face of the coil open. Once a year, a maintenance visit covers what you cannot reach:
- The whole coil and fan. Between the rows, the fan blade and shroud, and the tray on toe-kick models. If a coil can only be reached by sliding the tray forward, we do it with the anti-tip hardware in place.
- Measurements. Temperatures, recovery and run times, so a weak fan or low charge shows early, plus a corrosion check near the coast.
- Stored faults. On controls that keep a history, such as Classic, Integrated and later 600 and 700 units, we read it before anything is cleared.
- Doors, drain and water. Gaskets, closers and leveling, the defrost drain and drain pan, the filter date and the ice maker supply.
What it costs
If you would rather have it done, the service call is $79; it covers the trip and diagnosis and is applied to the work when you approve the written price. Condenser cleaning with a performance check is the first line below.
Built-in refrigerator and freezer repair (Sub-Zero, Thermador, Viking, Monogram, Miele)
| Repair | Typical price, parts and labor |
|---|---|
| Condenser cleaning and performance check | $150 to $250 |
| Condenser fan motor | $350 to $600 |
| Evaporator fan motor | $350 to $650 |
| Temperature sensor (thermistor) | $250 to $450 |
| Defrost heater or defrost termination | $350 to $650 |
| Water valve | $300 to $550 |
| Door gasket, per door | $300 to $600 |
| Door hinge or closer cam | $300 to $650 |
| Ice maker assembly | $450 to $900 |
| Electronic control board | $650 to $1,300 |
| Refrigerant leak repair and recharge | $900 to $2,000 |
| Evaporator replacement | $1,200 to $2,500 |
| Compressor replacement (sealed system) | from $2,000 |
Typical Orange County ranges for parts and labor. The $79 service call is applied to any of them. Parts that ship from the manufacturer and older or discontinued models can run higher. You get the exact written price after the diagnosis and before any work starts.
See pricing, the Sub-Zero repair overview, or contact us to book.
Talk to the technician first
Monday to Saturday, 8 AM to 7 PM. The $79 service call is applied to the repair.
Sub-Zero condenser cleaning: questions
Is once a year enough for a Sub-Zero condenser?
In a quiet home with no pets and light cooking, often yes. Most kitchens do better with twice a year, and homes with shedding pets, a busy range or salt air need it about every three months.
Do I need to pull my Sub-Zero out of the cabinet to clean the condenser?
No. Sub-Zero built-ins are designed to be cleaned from the front, through the top grille or the kickplate. Pulling one out risks the floor, the cabinetry and a tip-over.
Is the condenser on my Sub-Zero at the top or the bottom?
At the top, behind the grille, on Classic, PRO 48 and most 500 and 600 built-ins. At the bottom on the 600 series 601R, 601RG and 601F, and behind the kickplate on Integrated columns and drawers, 700 series, undercounter models and ice machines.
Can I use compressed air or a coil cleaner spray?
We advise against both indoors. Air packs dust deeper, and sprays leave residue beside the wiring. A soft brush and a vacuum are enough.
I bent some fins while cleaning. Is that a problem?
A small flattened patch costs a little air flow and is not urgent. Do not pry it with a tool; we can comb fins back on a visit.
My Sub-Zero cools fine. Do I still need to clean the condenser?
Yes. Dust builds up long before the food warms, and the compressor pays for it first in longer run times. Cleaning on schedule keeps it from running hot; the lifespan guide explains what that means over the years.